Have you ever wanted to be on the same network segment as a remote computer that you aren’t on the same segment as :p?? Well you can be, with the magic of connect back VPN tunneling!
Without any further ado, here’s my how-to guide.
Server Config
1. Install OpenVPN Access Server on an internet facing system, some sort of VPS will do nicely.
2. Log in to the management interface, which listens on port 943 https://example.com:943/admin/
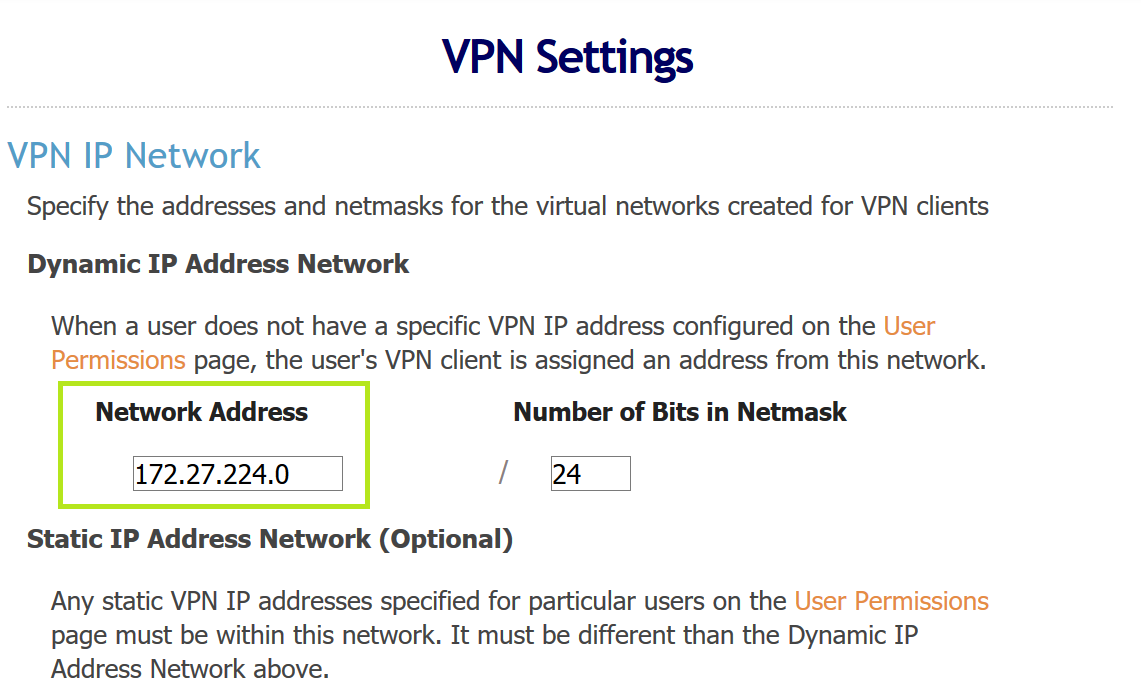
3. Go to “VPN Settings” (https://example.com:943/admin/vpn_settings) and take note of the “Network Address” value. This is the one network you will not be able to use the tunnel to connect to due to it already being used up by the VPN. I have chosen an address in 172.16.0.0/12 address space because in my experience it is less commonly used on client networks compared to 10.0.0.0/8 or 192.168.0.0/16 address space. To date, I have not had a collision of address space.
4. Go to “User Permissions” (https://example.com:943/admin/user_permissions) and create a user which will be used to connect to the VPN from the remote site (the place that you want to be on same segment as, but from your home)
5. In the “More Settings” column for this user click “Show”. Set “Allow Access To these Networks” and “Allow client to act as VPN gateway
for these client-side subnets” as shown:
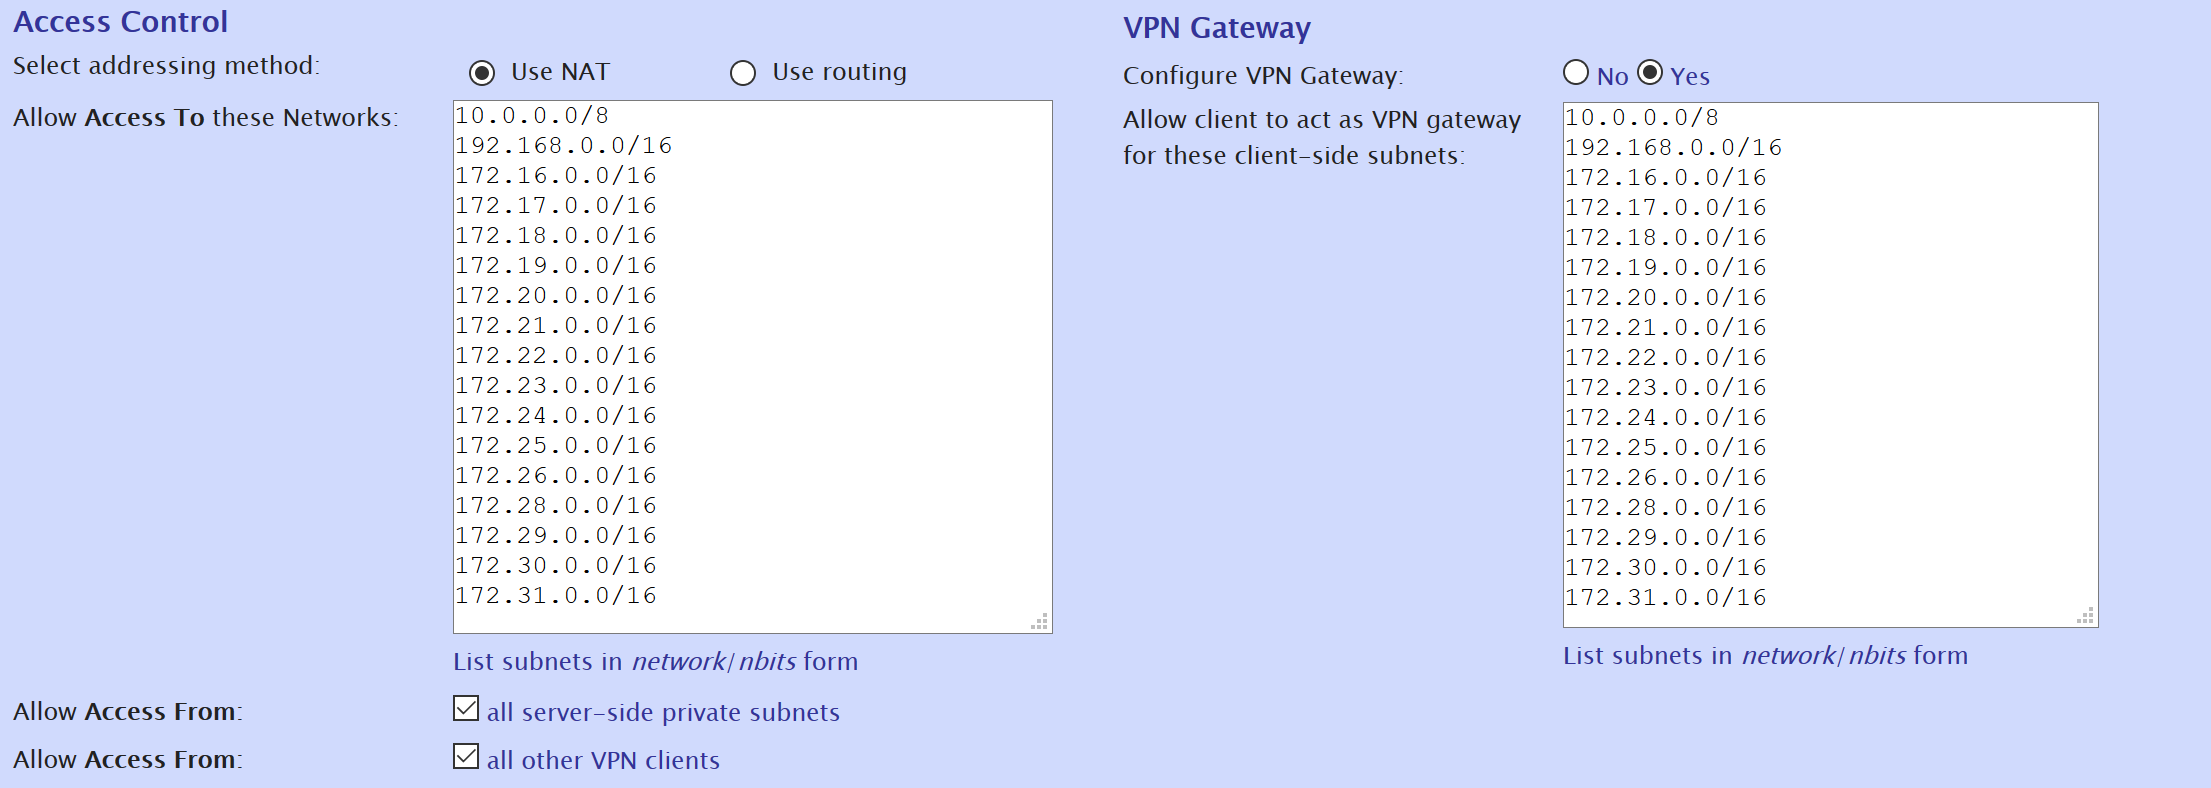
Here it is in text format in case anyone wants to copy/paste:
10.0.0.0/8
192.168.0.0/16
172.16.0.0/16
172.17.0.0/16
172.18.0.0/16
172.19.0.0/16
172.20.0.0/16
172.21.0.0/16
172.22.0.0/16
172.23.0.0/16
172.24.0.0/16
172.25.0.0/16
172.26.0.0/16
172.28.0.0/16
172.29.0.0/16
172.30.0.0/16
172.31.0.0/16
Note that these are all the networks except for the network used by the VPN itself (172.27.0.0/16 in my case). This means that the user we are modifying and route traffic for these networks.
6. Make sure to save your settings, this is it for server set up.
Client Config
1. From your local machine, connect to the VPN as a normal user, not the user that was just configured to do forwarding.
2. On the remote machine connect as the forwarding user that we just set up.
3. Now for the fun part, and the reason I wrote this post. After connecting as the forwarding user we need to actually configure the machine to act as a NAT point. I’ve only found a couple people on the internet talking about how to do this. Namely, the guys at Offensive Security and Hak5. Here’s the material they published that helped me get started:
- https://www.offensive-security.com/kali-linux/kali-linux-iso-of-doom/
- https://www.youtube.com/watch?v=3kEOB4qXPgY
Unfortunately for me when trying to follow their guides I wasn’t ever able to get it completely working. The trick for me was to set a lower priority metric on the VPN gateway, and set a higher priority on the remote machines local default gateway.
<vpn-network-address> – The network address of the VPN (see step 3 in server config). Mine is 172.127.224.0/24.
<bridged-inteface> – Interface name of a bridged adapter that has an IP on the network you’re trying to tunnel to
<local-gateway> – The non-VPN default gateway for the remote machine, the one that we will be tunneling through
<vpn-gateway> – The VPN default gateway. In my case this is 172.27.224.1 since my network address is 172.127.224.0
# enable ip forwarding
echo 1 > /proc/sys/net/ipv4/ip_forward
# create NAT point
iptables -t nat -A POSTROUTING -s <vpn-network-address> -o <bridged-interface> -j MASQUERADE
# remove the route for the VPN gateway
route del -net 0.0.0.0/1 gw <vpn-gateway>
# add it back but with a lower priority metric
route add -net 0.0.0.0/1 gw <vpn-gateway> metric 200
# for all the networks we want reach through the tunnel
# set the gateway to be the local gateway with a metric of 0
# This is the highest priority metric and will take priority over the vpn gateway
route add -net 10.0.0.0/8 gw <local-gateway> metric 0
route add -net 192.168.0.0/16 gw <local-gateway> metric 0
route add -net 172.16.0.0/16 gw <local-gateway> metric 0
route add -net 172.17.0.0/16 gw <local-gateway> metric 0
route add -net 172.18.0.0/16 gw <local-gateway> metric 0
route add -net 172.19.0.0/16 gw <local-gateway> metric 0
route add -net 172.20.0.0/16 gw <local-gateway> metric 0
route add -net 172.21.0.0/16 gw <local-gateway> metric 0
route add -net 172.22.0.0/16 gw <local-gateway> metric 0
route add -net 172.23.0.0/16 gw <local-gateway> metric 0
route add -net 172.24.0.0/16 gw <local-gateway> metric 0
route add -net 172.25.0.0/16 gw <local-gateway> metric 0
route add -net 172.26.0.0/16 gw <local-gateway> metric 0
route add -net 172.28.0.0/16 gw <local-gateway> metric 0
route add -net 172.29.0.0/16 gw <local-gateway> metric 0
route add -net 172.30.0.0/16 gw <local-gateway> metric 0
route add -net 172.31.0.0/16 gw <local-gateway> metric 0
Voila! If all went well the tunnel should be working now.
Troubleshooting
Ever since I figured out the issue of decreasing the priority on the route of VPN gateway this set up works for me first 99% of the time. Alas, sometimes there are problems.
Often times when there is an issue packets are making it to the forwarding host, but they don’t get routed properly from there. Whenever I’m having problems with my VPN tunnel the first thing I do is fire up tcmp dump like so:
tcpdump -nni any icmp
This just says to listen on all interfaces for ICMP packets, and to not resolve IP addresses or port numbers. The next thing I’ll do is from my local machine try to ping one of the internal IPs that I want to tunnel to. I was having an issue recently and started troubleshooting in just this very way. Here’s what I saw:
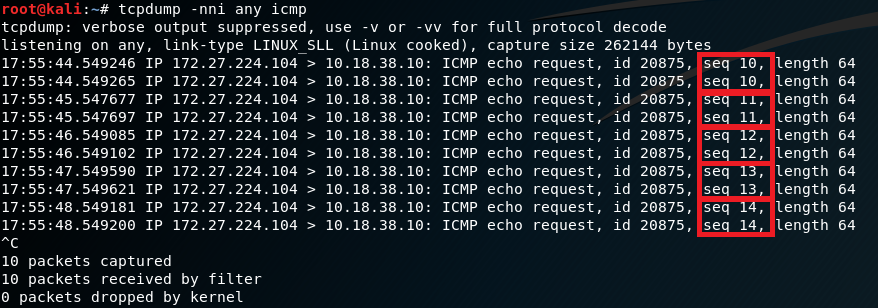
So I could see the forwarding host was successfully receiving the packets from my local machine over the VPN connection, and was forwarding them to the correct target IP. At first I thought maybe something went wrong with the NAT configuration, since the packets were being sent out but not coming back. I tried redoing my whole set up but was faced with the same problem. Then I realized the ping packets I was sending out were being duplicated by the forwarding host, as I have outlined above. For every 1 ICMP echo request I was sending from my local machine, 2 were being sent by the forwarding host. I’m not sure why this was happening, but there were 3 bridged interfaces on this virtual machine, all with valid IPs. I disabled all but the one I had specifically configured as the NAT interface and things started working again.
If memory serves I have done this before with multiple bridged interfaces and haven’t had a problem but anyway, having just one did the trick in this case.
Hope this helps somebody out there. Please leave comments with questions or suggestions.